

In this post, I share my experience painting upholstery including the pluses and minuses of this method of furniture rehabilitation.
The Home Green is reader-supported and may receive a commission if you decide to make a purchase through a posted link, at no cost to you.
If you’re a current or recovering HGTV addict like myself, you’re bound to have come across a home makeover show in which some kind of upholstery has been painted. The first time I saw it, I was taken aback and a bit skeptical. But still, I tucked the idea away for future reference.
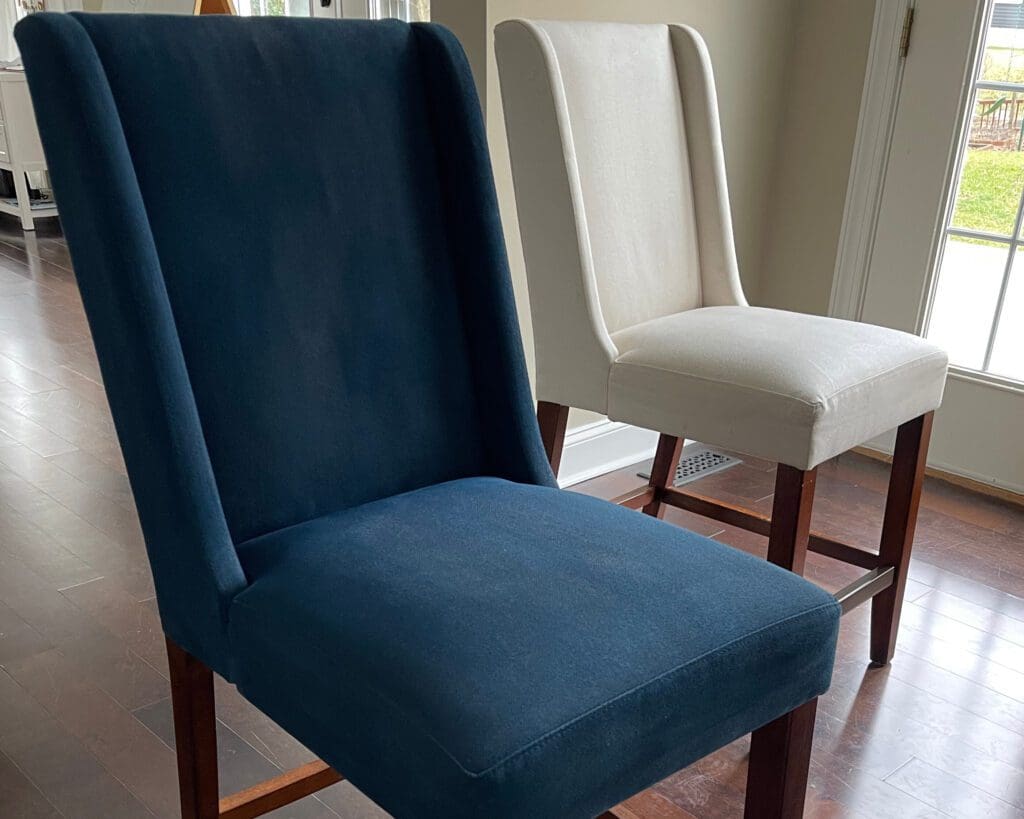
Fast forward to a few years later, and us tackling some home improvement projects including a kitchen facelift. We have a set of white upholstered counter stools for our island that are super comfortable but also super stained. Rather than try to sell or donate them – who would want stained counter stools, anyway – I thought I would try and make slipcovers. After several attempts to create a pattern for them, however, I realized that the odds of me wasting hundreds of hours and dollars were high.
Stumped as to what to do, I had a fleeting memory of upholstery painting. Could that work for these guys? After a little online research, it seemed like a possibility. I found a brand of fabric paint called FabriCoat with some positive reviews and figured what could it hurt? If I messed the chairs up, I’d be no worse off and could go back to my slipcover plan.
So now I had settled on the idea of upholstery painting but since starting this blog, I’ve read a lot about the hazards to look out for when purchasing paint. Among other things, there’s the fumes and the potential for off-gassing VOCs.
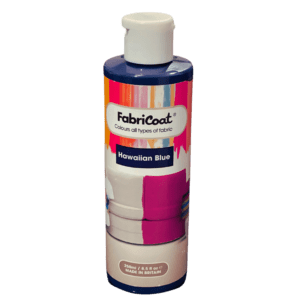
I wanted to make sure what I selected was non-toxic and found FabriCoat which seemed to fit the bill. I also planned to tackle this project indoors so a water-based, odor-free option was ideal. These criteria also ruled out any spray upholstery painting options.
The next challenge was selecting a color. While all of the main colors of the rainbow were represented in FabriCoat‘s lineup, there weren’t a lot of nuances in the shades they offer. Our home decor has a blue color scheme so I ordered an 8.5 oz bottle of Hawaiian Blue and crossed my fingers.
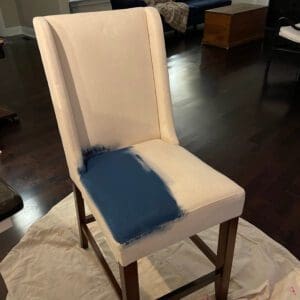
A few days later, I was ready to start our upholstery painting project. Per the instructions on the bottle, I first cleaned the chairs pretty thoroughly with upholstery cleaner – they looked better but were still pretty stained. Once they were completely dry, I began on my first coat.
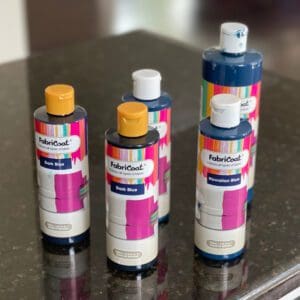
My first observation is that the paint did not go very far, at least not on my chair. The site said that I should be able to cover one chair with one bottle but it was clear that that wouldn't be the case for me. I attribute this to a couple of things:
I had to order a second bottle to complete the first coat but also realized that the color was a little too teal for our decor. I thought it still a good idea to complete the first coat in Hawaiian blue, however, to make sure the base color was consistent across the chair and I ordered a bottle of Dark Blue to see if that could be a better option.
The excitement continued when the new bottles arrived. Unfortunately, the dark blue looked just too dark for my needs. After some consideration, I decided to be bold and mix my own custom color. I finished the base coat of Hawaiian blue and then set out on my custom color journey.
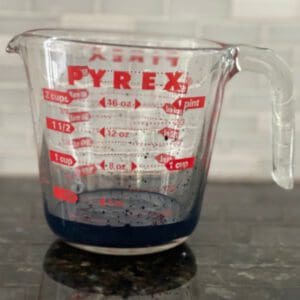
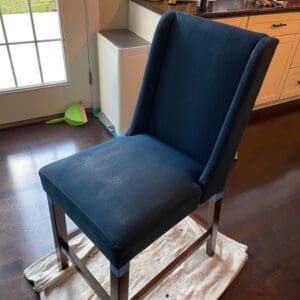
After playing around with a few color combinations, I ended up just doing ½ Hawaiian Blue and ½ Dark Blue for the second coat. There was nothing high-tech about how I made this happen, I just measured out equal parts of each blue in a measuring cup, mixed them with a chopstick, and poured the blend into a plastic container. The result was pretty close to the tone of blue that I needed. So I applied the second coat and waited for it to dry.
So at this point, chair #1 was dry and I had a chance to check out my handiwork. The good news was the color looked rich, it hid the stains that had been such an eyesore on the white chairs, and the fabric was still pretty comfortable.
A few more mixed observations: while the fabric wasn’t as crunchy as I feared it might be, it also wasn’t as soft as the original fabric before we painted it. In this case, I was okay with this. Since they get pretty heavy use and sustain lots of spills, I think this rougher texture might just hold up better. If you were painting a sofa or accent chair, though, this tougher surface might not be as desirable.
The other issue I had was that despite careful painting, the surface was slightly streaky. Again, I didn't really mind this as I think it kind of gives the chair some depth, like a watercolor painting. That said, if you’re looking for a completely uniform surface I’d recommend testing a few different application methods.
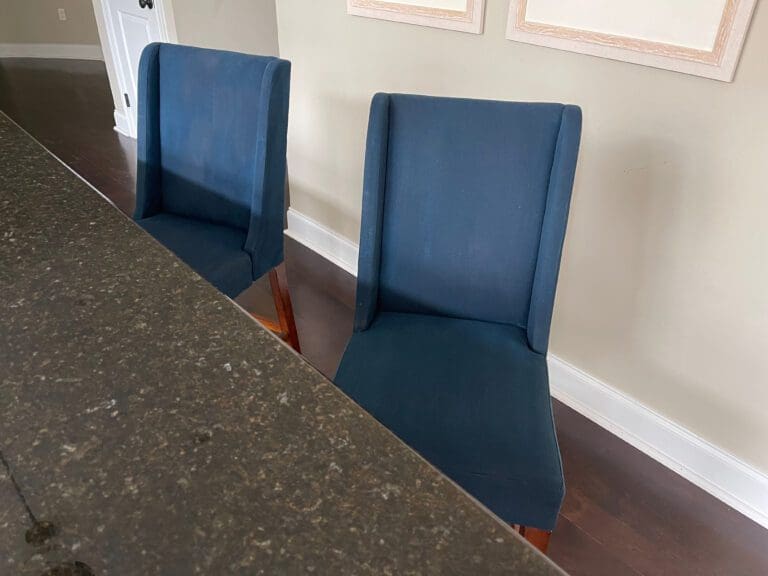
Having learned a few lessons about painting upholstery with the first chair, I was extra careful to paint the second one as uniformly as humanly possible. While the chair was wet, I thought I had done a perfect job. When it dried, however, I discovered that there were still quite a few streaks which was a little surprising. I went over the lighter spots one more time and feel like the final result could accurately be described as “pretty good.” (but not perfect) I could have done another coat but I decided it was fine for our use and I was honestly just kind of ready to be done.
Also, the paint isn’t super cheap. My final costs came out to $83 – although one of the bottles was not entirely used up. If you have a large piece, the price could start to get competitive with reupholstery.
Overall, I’m happy with the final result of our upholstery painting project and glad I was able to avoid having to buy new counter stools, especially since these probably have some good years left in them and just weren’t looking as pristine as they once did.
I would definitely recommend trying painting upholstered chairs or other furniture before ditching an old piece of furniture. Particularly if the upholstery is still in good condition but perhaps stained or just not to your liking, this could be a great option to save money and waste. While your color choices are somewhat limited, if you have a basic level of paint-mixing skills you can tweak the available colors to create what you need.
Yes! I found that painting upholstered chairs or other furniture is a definite possibility. I’m not an expert but my experience painting upholstery with this project has led me to the conclusion that this can be a great solution for the right situation. If you have a small piece and you don’t mind if the surface ends up being a little stiffer than it started, painting upholstery can be a great and inexpensive way to get more use of an existing piece of furniture.
Painting a fabric couch would not be high on the list of upholstery painting projects I would recommend. Although I think it would work, it would take so much paint that you’d be better off having the sofa reupholstered or just purchasing a slipcover. Additionally, paint seems to inevitably make the fabric a little stiffer which is fine with something more rigid like a dining chair, but feels less ideal for a couch.
Stay up to date on the latest news in sustainable interior design! Enter your email address below to be included on our newsletter distribution list.
Enter your email address below to receive the latest in creating a more sustainable home. By signing up to subscribe, you consent to our terms & conditions and privacy policy.